Transferring files from the Unix PC
(Some technical notes
by Brandon Craig Rhodes.)
The Unix PC was a 1980s-era personal computer;
there is more information about it at the
Unix PC Archive page.
I recently decided to copy the files
off of my account on an old Unix PC
before they are finally lost to a hardware failure.
This turned out to be more involved than I expected,
requiring an impromptu refresher course
on its user interface and communications software.
Here I present the results
so that others who want to salvage data from these venerable personal computers
can do so with the minimum of hassle.
Necessary equipment are the Unix PC in question,
a null modem cable as described at greater length below,
and another computer that can offer a serial command line
with X-modem software.
For the latter I used my Linux laptop,
but any decent operating system should do.
Because this page includes numerous screen shots
of the Unix PC in action,
it may also provide an occasion for nostalgia at this wonderful machine
that provided both Unix System V to the desktop and
a windows interface with integrated mouse.
In addition to describing in detail how to perform file transfer
using the native Unix PC software,
this page also describes:
Before proceeding,
one or two notes are in order
about navigating the Unix PC's interface.
When you log in to the Unix PC
you are presented with a menu called your Office.
As you select entries from it,
more windows will be opened on the screen,
some representing file folders,
others presenting menus of options,
and still others containing running programs.
You can always bring up a list of the currently open windows
by clicking with the mouse
on the W in the upper right hand corner of the screen,
or by pressing <Shift>
and either <Suspd> or <Rsume>;
pressing <Suspd> or <Rsume>
without holding down <Shift>
will usually cycle among the open windows,
but may not, depending on the application you are using.
To log off the Unix PC,
return to the Office and press <Exit>.
To shut the machine down so you can safely power it off,
return to the Office,
press <Cmd>,
and select |Shutdown| from the menu of commands.
Connecting the Unix PC to another machine
You will want to connect the serial ports
of your computer and the Unix PC with a null modem cable,
that swaps the RS-232 signals around
so that each machine transmits into the other's receive line.
A web search for “null modem”
should bring up dozens of pages showing the basic design,
and null modem cables are available commercially.
But there are two complications of which you should be aware:
-
The Unix PC has a full DB25 serial port
(modern computers have small DB9 serial ports).
-
The Unix PC serial port is female
(modern computers use male connectors and female cables).
So if you are building your own null modem cable,
it will need a female connector on one end for your personal computer,
and a male DB25 connector on the end for the Unix PC.
If instead you acquire a null modem cable built for modern personal computers,
you will need a small male-male DB25 cable or gender changer
to connect its female end to the female port on the Unix PC.
Note
that you will almost certainly want a fully connected null modem cable
so that you can enable hardware flow control.
Some homemade null modem cables are rudimentary,
and only bother connecting the Transmitted Data and Received Data lines —
leaving unconnected the Request to Send (RTS)
and Clear to Send (CTS) lines,
with which RS-232 devices traditionally signal each other
when they are ready to receive data.
While this omission rarely affects modern machines,
whose speed and well-buffered serial port hardware make data loss unlikely,
the Unix PC easily finds itself overwhelmed at high data rates.
Unless the Unix PC can control when it receives data
through a connection between its RTS line and the CTS pin on the other machine,
you will probably find that only very low baud rates
prevent bytes from being lost.
When the RTS and CTS signals are unavailable,
one can enable software flow control as an alternative;
but this works only for text connections,
and breaks badly when you attempt to transfer files.
It reserves two special characters
(usually those sent on the keyboard
by <Cntl>+<S>
and <Cntl>+<Q>)
as signals which tell the other machine to halt and resume transmission.
You can test this out on the Unix PC
at any Unix prompt —
begin listing a long directory (try ls /usr/bin)
and then press <Cntl>+<S>;
the scrolling output should pause and wait
until you press <Cntl>+<Q> to resume it.
The problem with software flow control
is that file transfer protocols generally feel free
to use any characters they please,
and the first <Cntl>+<S>
that happens to be sent
freezes the connection and halts the file transfer.
The procedures below will therefore assume
either that your are using hardware flow control
with correctly connected CTS and RTS lines,
or that you will select a slow enough data rate
that flow control is not necessary.
Configuring the RS-232 interface of the Unix PC
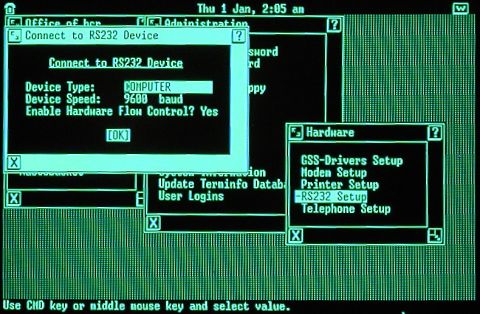 After logging in you should be presented with your Office menu.
Select |Administration|,
then |Hardware Setup|,
and finally |RS232 Setup|
to bring up the serial port configuration dialogue, shown at right.
(In case the hardware setup entry is missing from your administration menu,
there is a section below that describes how to add it.)
After logging in you should be presented with your Office menu.
Select |Administration|,
then |Hardware Setup|,
and finally |RS232 Setup|
to bring up the serial port configuration dialogue, shown at right.
(In case the hardware setup entry is missing from your administration menu,
there is a section below that describes how to add it.)
The RS-232 dialogue presents three fields.
At the Device Type field,
press <Cmd> and choose |COMPTUER|.
For the Device Speed use anything you want;
we will be making outgoing connections,
which ignore this setting and use their own baud rate.
Choose |Yes| for hardware flow control
if your null modem cable connects
the RTS and CTS lines of your two computers,
as described in the previous section;
otherwise choose |No|
to prevent the Unix PC for waiting forever
for a Clear to Send signal that will never reach it.
When done, press <Enter> to submit the form.
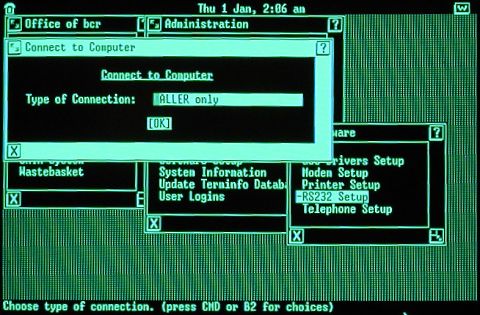 A final dialogue box will appear,
asking whether you want the port configured
to accept incoming connections or make outgoing ones.
Press <Cmd>
and select |CALLER only|
to prepare the port for outgoing connections.
Press <Enter> to submit the form
and you should get the message:
A final dialogue box will appear,
asking whether you want the port configured
to accept incoming connections or make outgoing ones.
Press <Cmd>
and select |CALLER only|
to prepare the port for outgoing connections.
Press <Enter> to submit the form
and you should get the message:
The RS232 port is now set up.
Please press Enter to continue.
This indicates that the port is now ready for use.
Had you chosen |HOST only| instead,
the port would prepare to answer incoming connections from another machine.
But the Unix PC will apparently only offer a login prompt
when it senses carrier detect —
a signal which most null modem cables cannot provide.
We will therefore rely upon outgoing connections,
which can easily be made to ignore the lack of carrier detect.
Creating a profile for your serial port
 Next you must create an RS-232 profile
specifying the communications settings you want to use.
You can create as many profiles as you wish,
one for each combination of serial port settings you find useful.
For the moment we will create a single entry
for standard 9600 bps operations.
Each profile is actually a file in your
Next you must create an RS-232 profile
specifying the communications settings you want to use.
You can create as many profiles as you wish,
one for each combination of serial port settings you find useful.
For the moment we will create a single entry
for standard 9600 bps operations.
Each profile is actually a file in your
~/Filecabinet/Profiles/
directory with an :A2 extension.
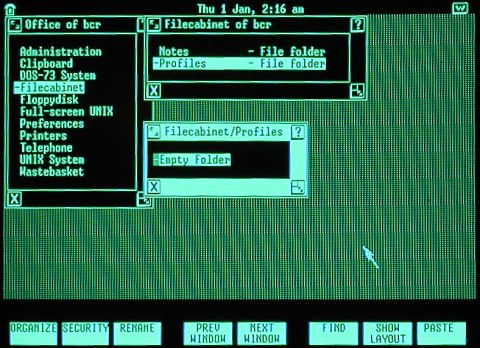
Profiles can easily be created from the file manager
through the following procedure.
From your Office, select |Filecabinet|
and from inside it select your |Profiles| directory.
You may find it empty, as shown at the right,
or it may already contain several profiles;
in either case we will create a new one for this project.
Once in the Profiles window,
press the <Creat> key on the left side of your keyboard
(you could also press <Cmd>
and select |Create| from the menu).
This will bring up a list of file types that you can create.
Select |RS-232 Profile| from the available file types,
enter the name 9600-local for the new file,
and press <Enter>.
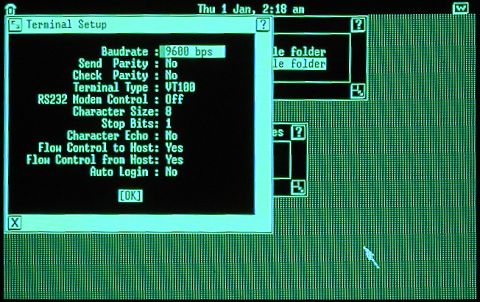 This should bring you to the Terminal Setup screen
where all of the attributes of your new profile are displayed.
The basic communications settings
are set to reasonable defaults in the illustration on the right:
the fastest speed of |9600| bps,
|No| parity checking in either direction,
the ubiquitous |VT100| terminal type,
and eight-bit characters separated by one stop bit.
This should bring you to the Terminal Setup screen
where all of the attributes of your new profile are displayed.
The basic communications settings
are set to reasonable defaults in the illustration on the right:
the fastest speed of |9600| bps,
|No| parity checking in either direction,
the ubiquitous |VT100| terminal type,
and eight-bit characters separated by one stop bit.
There are two options we can ignore and leave disabled.
Character Echo provides for the rare case
of connecting to a system that does not echo your keystrokes;
when enabled,
the Unix PC itself will echo your keystrokes
so you can see what you are typing.
Auto Login
lets you construct a script that automatically responds to prompts
as you connect to another system.
The remaining three options, however,
are critical to the proper operation of your data connection:
- RS232 Modem Control
-
This option determines whether the Unix PC
will respect the carrier detect signal,
with which modems indicate an active telephone data connection.
When |Yes| is selected,
only the terminal emulator itself
can communicate in the absence of carrier detect;
all other operations, like file transfers,
hang when carrier detect is dropped —
preventing them from flooding the modem's command line with garbage
should the telephone connection die unexpectedly.
But null modem cables rarely provide carrier detect,
so you should select |No|
when making a serial connection directly to another computer.
The symptom of leaving this option enabled when directly connecting
is that you can log into the remote system normally,
but attempts to transfer files hang.
- Flow Control to Host
-
If you said |Yes| to hardware flow control
in the device setup window,
this option tells the Unix PC
to only send data when receiving a Clear to Send signal.
Though it is unlikely that the Unix PC will be able
to send data fast enough to challenge a modern computer,
this option is always a good idea —
so long as your null modem cable supports CTS,
and the other machine is configured to send RTS when ready to receive data.
But if deficiencies in your null modem cable
or the configuration of the other machine
are preventing the Unix PC from ever receiving a CTS signal,
disable this option so it can transmit without CTS.
If instead you answered |No| to hardware flow control,
this option tells the Unix PC
to monitor the characters sent by the other machine
for start and stop characters;
leave it disabled,
to prevent the file transfer protocol from accidentally pausing the connection
if it uses those characters itself.
- Flow Control from Host
-
If you said |Yes| to hardware flow control
in the device setup window,
this option tells the Unix PC that it can use its RTS signal
to control when the remote machine transmits data.
If your null modem cable correctly connects
the Unix PC's RTS line to the other machine's CTS pin,
and the other machine is configured to only transmit when receiving CTS,
then you should certainly activate this option
so that you can use high baud rates without losing data
at moments when the Unix PC becomes overwhelmed.
If your cable or other computer does not support this signal,
you will want to leave this option off and try using low baud rates.
But if your answer was |No| to hardware flow control,
this option tells the Unix PC
to send a <Cntl>+<S>
when it is feeling overwhelmed
and then a <Cntl>+<Q>
when it is ready to receive more data.
This will wreak havoc with any file transfer
and should certainly be disabled.
Once you have chosen appropriate settings,
press <Enter> to save your settings to the profile.
You can always select the profile again
from the Profiles window
if you want to further modify its settings.
Adding a data entry to your directory
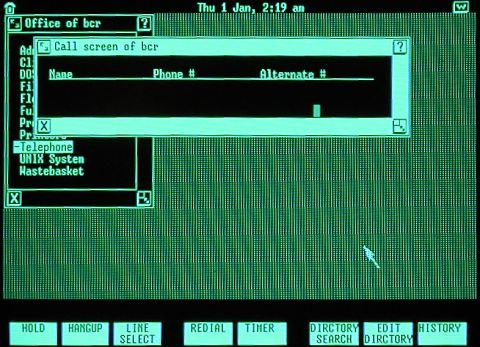 We are almost ready to make our connection.
From your Office,
select |Telephone| to bring up your call screen;
this may be empty like the one shown at the left,
or it may contain several entries already.
We are going to create a data connection entry
that uses the RS-232 profile we just designed.
Press <F7> which,
you can see from the bottom of the screen,
allows you to edit your telephone directory,
and select |Create data entry|
from the list of commands.
We are almost ready to make our connection.
From your Office,
select |Telephone| to bring up your call screen;
this may be empty like the one shown at the left,
or it may contain several entries already.
We are going to create a data connection entry
that uses the RS-232 profile we just designed.
Press <F7> which,
you can see from the bottom of the screen,
allows you to edit your telephone directory,
and select |Create data entry|
from the list of commands.
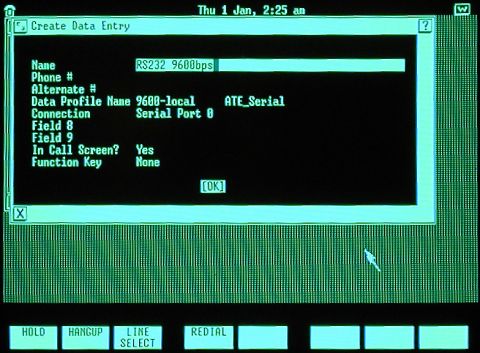 You can leave most of the new data entry blank.
As in the example to the right,
give it a name you will recognize when you return to the call screen,
and make sure that In Call Screen
is set to |Yes| so that it will be listed.
Use the Data Profile Name
to associate it with the data profile you created earlier,
and make sure it will use |Serial Port 0|.
You can leave most of the new data entry blank.
As in the example to the right,
give it a name you will recognize when you return to the call screen,
and make sure that In Call Screen
is set to |Yes| so that it will be listed.
Use the Data Profile Name
to associate it with the data profile you created earlier,
and make sure it will use |Serial Port 0|.
Press <Enter> when you have completed your changes
to return to the call screen.
If after returning to the call screen
you want to edit the data profile again,
simply highlight it,
press <F7>,
and select |Modify data entry|
from the list of commands.
Connecting and transferring files
 Finally we are ready to connect to your other machine
and copy files off of the Unix PC!
Connect your null modem cable to the Unix PC
and your other machine,
using any necessary converters
to deal with the gender of the Unix PC's serial port.
Then highlight the call screen data entry we have just created,
as shown at right,
and press <Enter>.
The Unix PC will churn
while the asynchronous terminal emulator is loaded
(the program is called async_main),
and then the screen will go black
and you will have access to the serial line.
Finally we are ready to connect to your other machine
and copy files off of the Unix PC!
Connect your null modem cable to the Unix PC
and your other machine,
using any necessary converters
to deal with the gender of the Unix PC's serial port.
Then highlight the call screen data entry we have just created,
as shown at right,
and press <Enter>.
The Unix PC will churn
while the asynchronous terminal emulator is loaded
(the program is called async_main),
and then the screen will go black
and you will have access to the serial line.
Your first question upon entering the terminal emulator
is probably how to leave,
since it uses the full screen and does not provide a window border.
On the Unix PC you can always move to another window
by clicking W in the upper right hand corner of the screen,
or pressing either <Shift>+<Suspd>
and <Shift>+<Rsume>.
The terminal emulator will continue running while you do other tasks,
and will be ready when you return.
But you can also get the attention of the terminal emulator itself:
-
<Shift>+<Cmd>
gives you a list of available commands.
-
<Shift>+<Exit>
closes the terminal emulator and returns you to the call screen.
We are now ready to activate a login prompt on the other machine.
 In this example the other machine is my Linux laptop,
but any operating system with a decent command line will do.
From the root prompt of my Linux machine
I can provide the serial port with a login prompt simply by typing:
In this example the other machine is my Linux laptop,
but any operating system with a decent command line will do.
From the root prompt of my Linux machine
I can provide the serial port with a login prompt simply by typing:
$ getty -L -h /dev/ttyS0 9600 vt100
where -L tells getty
the connection is local and it need not wait for carrier detect,
and -h turns on hardware flow control.
You might want to omit -h
if your null modem cable does not support the CTS and RTS signals.
Read your own getty(8) man page for details,
and check whether you enabled hardware flow control
in the communications profile you created earlier.
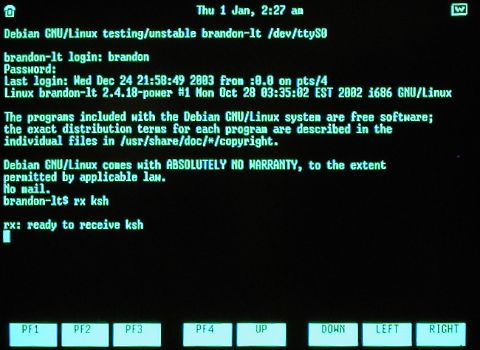
At right you can see that getty
immediately printed a login banner.
I entered the username and password of my account on the laptop,
and — after the usual welcomes and disclaimers —
was presented with a login shell.
Since the umodem file transfer protocol
supported by the Unix PC
turns out to be an implementation of the standard X-Modem protocol,
I have run the rx command
which is sitting and waiting for an X-Modem transmission to begin.
Its argument tells it the file
into which it should place the data it receives;
here I have named the file ksh,
because I will be transmitting /bin/ksh
from the Unix PC.
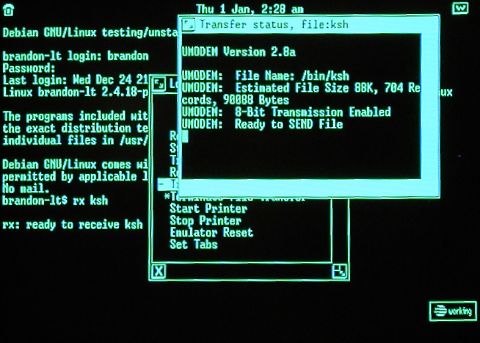 Now that the laptop is ready to receive a file,
I press <Shift>+<Cmd>,
select |Transmit File -
UMODEM| from the command menu,
select the |Binary| transfer mode
and enter the file name /bin/ksh,
and finally press <Enter> to begin the transfer.
The status of the file transfer will be displayed
as in the screen shown at the right,
and once the tranfer begins the program will begin printing
Now that the laptop is ready to receive a file,
I press <Shift>+<Cmd>,
select |Transmit File -
UMODEM| from the command menu,
select the |Binary| transfer mode
and enter the file name /bin/ksh,
and finally press <Enter> to begin the transfer.
The status of the file transfer will be displayed
as in the screen shown at the right,
and once the tranfer begins the program will begin printing
Sent sector 1.
Sent sector 2.
Sent sector 3.
Sent sector 4.
and so forth until the complete file has been transmitted.
At any time you can return to the command menu
and select |*Terminate File Transfer|
to interrupt the file transfer.
You should be returned to the terminal emulator,
and the rx command on your other machine
should return you to the command prompt,
once the file transfer has completed.
There are two drawback to this file transfer method.
First, it is somewhat slow —
X-Modem does not send each block
until the receiver has verified the checksum of the previous block,
making the serial line sit idle between blocks
until the receiver acknowledges its receipt.
Second, X-modem is not careful to end the file at exactly the right place
and you will usually find it padded with a few null characters on the end,
which must be snipped off before the checksums of the original file
and its copy will match.
But as this seems to be the only error-checked file transfer method
natively supported by the Unix PC,
these limitations are best endured.
Depending on the privileges of the user you have logged in as,
the Unix PC may not present you
with the |Hardware Setup| option
in your Administration menu.
It turns out that any user can gain this option
simply by creating
an Administration file in his home directory
with the entries he needs;
I usually add both a Hardware Setup entry
and one that provides a root prompt:
Name = Hardware Setup
Default = Open
Open = UA Hardware
Help = EXEC -d /usr/bin/uahelp -h /usr/lib/ua/admin.hlp -t "Hardware Setup"

Name = Root Shell
Default = Run
Run = EXEC -pwd /bin/ksh
After making changes to this file
you must log out and back in to bring them into effect.
It must have seemed reasonable on these small machines
to allow knowledgeable console users access to a root prompt.
Users must not take advantage of this to undertake mischief.
I have only supplied these details to assist any administrator
who finds himself in charge of a Unix PC
whose root password was long ago forgotten,
but who might have access to another user account;
note in particular that the tutor account
comes installed on the Unix PC without a password.
For complete documentation on adding entries to your Office menus,
see the ua(4) manual page.
You can see more examples in the /usr/lib/ua directory
of your Unix PC,
where all of the default menu entries are defined.
While the Unix PC dialogue for editing RS-232 profiles
shows 9600 as the highest available speed,
the serial port hardware itself is capable of transmitting at 19,200 bps.
To select this speed one must manually edit the profile,
which is somewhat difficult;
unlike most Unix configuration files,
these communications profiles are encoded in a binary format.
If only Unix had provided a utility
for turning od(1) output back into binary,
we could accomplish tasks like this with a simple text editor!
The only place in the Unix PC documentation
where this higher speed is mentioned is its termio(7) man page —
even the stty(1) man page
shows 9600 as the highest baud rate,
followed by exta and extb,
which select externally clocked data rates.
But the application interface for terminal control
described in termio(7) shows
that the c_cflag field of the termio struct
can have the values:
B9600   0000015  9600 baud
B19200  0000016  19200 baud
EXTB    0000017  External B
It turns out that each communications profile
specifies the baud rate in the byte at offset seven.
We can examine the 9600 baud profile we have already created
by selecting UNIX System from the Office
and running the commands:
$ cd Profiles
$ od 9600-local:A2
0000000 053504 012004 000000 004075 000000 000000 000000 000000
0000020 000000 000000 000000 000000 000000 000000 000000 000000
*
0001514
The value 075 in byte seven
seems to combine the values B9600 and CS8
from the definition of c_cflag in termio(7),
specifying 9600 bps using eight-bit bytes.
To increase the baud rate we must simply replace B9600
with B19200, making the value 076.
Since Unix does not provide a tool for manipulating binary files,
use your favorite editor at the command prompt
to create this tmp.c file:
#include <fcntl.h>
int main() {
	char c = 076;
	int fd = open("19200-local:A2", O_RDWR);
	lseek(fd, 7, 0);
	write(fd, &c, 1);
}
Creating your 19,200 bps profile is now as easy as:
$ cp 9600-local:A2 19200-local:A2
$ cc tmp.c
$ ./a.out
You can verify that this operation succeeded by examining the new file
and confirming that its seventh byte has been set to the desired value:
$ od 19200-local:A2
0000000 053504 012004 000000 004076 000000 000000 000000 000000
0000020 000000 000000 000000 000000 000000 000000 000000 000000
*
0001514
Now return to your Telephone window
and create an entry using this new profile
to begin communicating at high speed.
Last updated
by Brandon Craig Rhodes
on 26 Dec 2003.